Advertisement
Quick Links
Thank you for purchasing a sealey product. manufactured to a high standard, this product will, if used according to these
instructions, and properly maintained, give you years of trouble free performance.
IMPORTANT: PLEASE READ THESE INSTRUCTIONS CAREFULLY. NOTE THE SAFE OPERATIONAL REQUIREMENTS, WARNINGS & CAUTIONS. USE
THE PRODUCT CORRECTLY AND WITH CARE FOR THE PURPOSE FOR WHICH IT IS INTENDED. FAILURE TO DO SO MAY CAUSE DAMAGE AND/OR
PERSONAL INJURY AND WILL INVALIDATE THE WARRANTY. KEEP THESE INSTRUCTIONS SAFE FOR FUTURE USE.
Refer to
Wear eye
instructions
protection
1. safeTy
WarnInG! ensure Health and Safety, local authority and general workshop practice regulations are adhered to when using tools.
‰
WarnInG! Do noT use this tool on an inflated tyre, ensure that all air pressure has been expelled before attempting to replace the
‰
tyre valve.
ensure that a vehicle which has been jacked up is adequately supported with axle stands.
9
Do noT use tools if damaged.
8
Maintain tools in good and clean condition for best and safest performance.
9
Wear approved eye protection. A full range of personal safety equipment is available from your Sealey Stockist.
9
Wear suitable clothing to avoid snagging. Do noT wear jewellery and tie back long hair.
9
Do noT use on wheels with inner tubes.
8
Do noT use on alloy wheels.
8
Do noT use this tool when you are tired, under the influence of alcohol, drugs or intoxicating medication.
8
Do noT use this tool for any purpose other than that for which it is designed.
8
Do noT use this tool if any part of it is damaged.
8
Do noT allow untrained persons to use this tool.
8
When not in use, clean and store in a safe, dry, childproof area.
9
WarnInG! The warnings, cautions and instructions in this manual cannot cover all possible conditions and situations that may occur.
‰
It must be understood that common sense and caution are factors which cannot be built into this product, but must be applied by the
operator.
2. InTroDucTIon
Remove and install leaking tyre valves without having to remove the tyre. Works on steel wheels
and especially good for valves on motorcycle or agricultural wheels. Time saving tool. not
suitable for high pressure valves.
3. specIfIcaTIon
model no:........................................................................................................TsTVrK
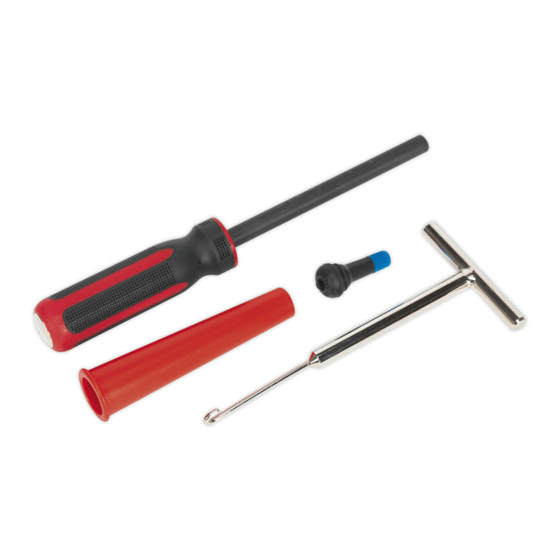
Contents: ..................................... Cone, Push/Pull driver, Valve Hook Tool, Tyre Valve
nett Weight: ........................................................................................................0.39Kg
4. operaTIon
WarnInG! ensure that you read, understand and apply Section 1 safety instructions.
‰
4.1.
remoVInG Tyre ValVe from Wheel
4.1.1.
Using a suitable lubricant, lubricate the valve hook tool and the area around the tyre valve.
4.1.2.
Push the tyre valve body to one side and insert the valve hook tool between the tyre valve and the valve hole in the wheel rim (fig.2).
4.1.3.
Turn the valve hook tool 90° clockwise so that the hook is under the tyre valve.
4.1.4.
lift the valve hook tool and pull the tyre valve from the wheel rim (fig.3).
fig.2
© Jack Sealey limited
Tyre ValVe remoVal/InsTallaTIon Tool
TsTVrK
Model no:
fig.3
Original Language Version
fig.1
TSTVRK Issue 2 (HF) 15/04/19
Advertisement

Summary of Contents for Sealey TSTVRK
- Page 1 TsTVrK Model no: Thank you for purchasing a sealey product. manufactured to a high standard, this product will, if used according to these instructions, and properly maintained, give you years of trouble free performance. IMPORTANT: PLEASE READ THESE INSTRUCTIONS CAREFULLY. NOTE THE SAFE OPERATIONAL REQUIREMENTS, WARNINGS & CAUTIONS. USE THE PRODUCT CORRECTLY AND WITH CARE FOR THE PURPOSE FOR WHICH IT IS INTENDED.
- Page 2 Important: no liability is accepted for incorrect use of this product. Warranty: Guarantee is 12 months from purchase date, proof of which is required for any claim. sealey Group, Kempson Way, suffolk Business park, Bury st edmunds, suffolk. Ip32 7ar 01284 757500 01284 703534 sales@sealey.co.uk...


